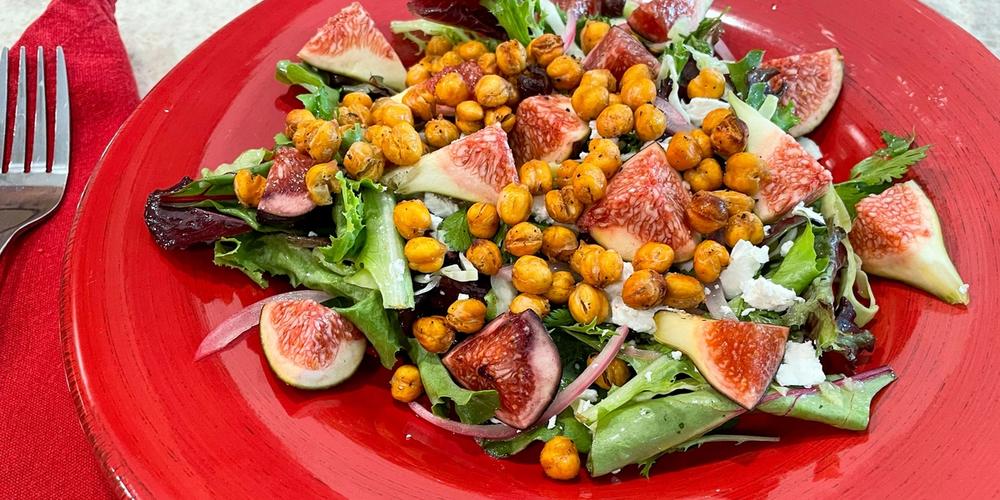
Fig & Crunchy Chickpea Salad with a Refreshing Mojito Mocktail


I first saw this Peruvian-inspired salad recipe on a blog of a professionally trained chef living on Pender Island in British Columbia called Island Vittles. The site is no longer maintained, but you can search for it. What I love about it the most is the crunchy chickpeas. I’ll make a large batch and save them in an airtight container in the cupboard for an easy-to-grab snack and salad topper. They don’t last long enough to worry about keeping them unrefrigerated, but I wouldn’t let the cooked chickpeas sit there for more than 3 days at room temperature. Placing them in the refrigerator can make them chewy.
I put my own twists on this for sure. I made a slightly simpler vinaigrette than the original recipe. I added the fresh cilantro as a green to the salad rather than the dressing. Feel free to omit it completely if it’s not something growing in your garden or you don’t like the herb’s taste.
There is a heavy use of fresh roasted and ground cumin seeds in the original: in the dressing, flavoring the chickpeas, and dusted on the plate. I prefer the taste of coriander, so I used that when cooking the chickpeas, and a touch in the dressing.
Roasted corn is also featured in the original recipe. Feel free to fry some up and add it to this dish. If you do, cook it separately from the chickpeas for it to cook more evenly.

We have three fig trees in the demonstration domes at our headquarters in Pagosa Springs. They usually begin to ripen by late July, and September can be when the harvest is the most bountiful, depending on the tree. So far I have dehydrated them and used those to make jam and pastries, but I love them best fresh from the tree. When one of our gardeners, Kim, said she was looking for more ways to use figs, I remembered this salad and thought it might be a fun new way to try the classic goat cheese and fig salad. Let’s get cooking!
Fig & Crunchy Chickpea Salad

Vinaigrette Ingredients:
- 1/3 cup of olive or vegetable oil
- 1/4 cup of pickled pepper brine
- (freshly squeezed lime juice, other pickle brines, or apple cider vinegar can be substituted)
- 1 clove of minced garlic
- 1 tsp of honey or sugar*
- 1/8 tsp coriander
- salt* and pepper to taste
- Pinch of red pepper flakes if you want to add some spice
*You will likely require less salt and sugar if you are using a brine that already contains these.
Mix all of the ingredients above in a jar with a lid. Shake vigorously to combine, and set aside to allow the flavors to develop. Mix/shake right before dressing your salad.

Salad Ingredients:
- Mixed greens
- Pickled (see recipe below) or raw thinly sliced red onions
- Goat cheese
- 2–4 figs, cut into 4–8 pieces
- 1–2 Tbsps of vinaigrette
For the chickpeas:
- 2 cups of chickpeas (cooked, drained, and dried with a clean dish towel or paper towels)
- Either a drizzle of olive oil or up to a 1/3 cup of vegetable oil (see notes below)
- 1/4 tsp coriander
- Salt and pepper to taste
Quick Pickled Red Onion
I love to experiment on the fly. I’d planned to use raw red onion for this salad, but at the last minute I decided to turn my onions into pickles because I love to pickle everything! I also thought it would be a nice balance to the vinegar in the dressing, the creamy richness of the goat cheese, and the sweetness of the figs.

Pickled Onion Ingredients:
- 1/4 cup thinly sliced red onion
- 1/4 cup warm water
- 1/4 cup apple cider vinegar
- 1/2 tsp salt
- 1/4 tsp sugar
- 4 peppercorns
- Small piece of bay leaf
Mix salt and sugar with warm water until dissolved. You can add up to a teaspoon of each. I kept them light here to allow the onion and acidity to shine through. Add the vinegar to the water. Pour over onions, peppercorns, and bay leaf. Refrigerate for about two hours. The longer you allow the onions to sit in the brine, the more the flavor will develop. If you’re in a pickle, the onions can rest in the liquid for as little as 15–30 minutes to soften and take on some of the flavors of the vinegar. There was more liquid than I needed for a quarter cup of onions, so you could cut the quantities in half or do as I did and save the extra in a jar for the next time you’re ready for a quick fridge pickle.
Toast the Chickpeas to Make Them Crunchy
The original recipe calls for toasting the cooked, drained, and dried chickpeas in a pan with about 1/8” of vegetable oil for about 10 minutes per side, careful not to disturb them for about 5 minutes at a time to be sure they turn golden brown. Another option would be to toss with a drizzle of olive oil and spices, spread on a cookie sheet, and cook in a preheated 425º oven for 20–30 minutes. You’ll definitely use less oil than the stovetop method. It’s good to have options, especially if you don’t want to turn on the oven or watch over a pan.

Assemble the Salad
Toss the greens with 1–2 Tbsps of dressing per serving, depending on your taste. The leaves should be glistening, not soaked. Layer your greens on a plate with the sliced onions, crumbles of goat cheese, figs, and of course the chickpeas! It’s easy and encouraged to use around a cup of chickpeas per serving. Don’t forget the fresh ground black pepper! Serve with a glass of white wine or the mojito mocktail below.
Tips for the Salad Bar
If you decide to store any leftover dressing and use olive oil as your base, the oil will solidify in the fridge. Remove it 15–30 minutes before serving to give it a chance to warm to room temperature and become liquid again.
For the salad, the proportions are mostly up to you. You can trim this down to a single serving quite easily, or make it for a family or large gathering. Whatever you choose, I recommend at least roasting 2 cups of cooked chickpeas. If there are any leftovers, they make tasty snacks and fun additions to anything that needs a little crunch in savory dishes where you might use toasted nuts.
For the mixed greens, use anything growing in your garden that sounds good: radishes, spinach, lettuces, tender baby kale or beet greens, arugula, herbs. I used a baby spring mix, fresh chopped cilantro, and cabbage.
The number of figs you choose depends on how many you plan to eat while you’re making the salad. Quartering them can make for a very pretty presentation, but I prefer to cut them bite-sized.

Bonus Recipe: A Refreshing Mojito Mocktail
Mint is one of those herbs that can overtake a garden pretty quickly. In a dome, we recommend keeping it in a container. I like to dry it for tea and use it in mojitos, but I’m not always looking for the alcohol that is traditionally added. I want a beverage I can sip any time of the day, and maybe enjoy two or three on a hot day without paying the consequences.
Mojito Ingredients:
- 8–10 fresh mint leaves, whole or roughly chopped
- Half a lime, cut into wedges, and more for garnish
- 2+ Tbsps simple syrup (add to taste, recipe below) or 2 tsps granulated sugar or honey
- Ice to fill your glass, preferably crushed
- Chilled club soda or sparkling water
Herbal Simple Syrup

For the base of my mojito, I started with a lemon verbena simple syrup. I picked verbena leaves from the campus domes a few years back and dehydrated them. They’ve been stashed in my tea cabinet for making my own tea blends. My favorite way to use them is in a simple syrup that I craft with honey. It’s super simple!
Bring 1/2 cup of water to a boil, and pour it over 1–2 Tbsps of crushed verbena leaves in a mason jar. Let steep for about 10–15 minutes, then strain off the leaves, or start by using a tea ball for easier clean-up. While the water is still warm, add 1/2 cup of honey and shake until the honey has fully dissolved. Allow to cool, and chill in the fridge before making your mocktail.
You can experiment with other herbs including lavender, ginger, or rosemary. Also, this syrup can be added to your morning tea or used as a sweetener in lemonade.
Craft Your Virgin Mojito
Now we’re ready to assemble the drink. Muddle 1/2 lime, cut into wedges, in a pint-sized glass. I used the back of a wooden spoon. Add 2 Tbsps of your simple syrup. Or if you decided to skip making the syrup, you can use 2 tsps of straight-up granulated sugar or honey. If you’re growing stevia, 2-3 roughly torn leaves can replace the sugar entirely. Mash your choice of sweetener a little as well into the limes.
Add your roughly chopped mint leaves or whole mint leaves depending on size, and gently press with your spoon or muddler only two to three times to avoid making the mint taste bitter. If you don’t like having leaves in your beverage, complete all of the previous steps in a cocktail shaker with ice and shake a few times. Strain the liquid into your glass.

No matter which technique you choose, add ice and your sparkling water to fill the glass. For a different twist, consider using a ginger beer, which is a little less sweet than ginger ale. Stir gently to evenly distribute the sweet and minty citrus liquid, and enjoy! If you want to get fancy with the presentation, add a lime wedge or wheel and a sprig of mint.
If you want to get creative and try new flavors, consider muddling berries or a few slices of cucumber with your limes. Play with whatever you have fresh from the garden and suits your taste.
And there you have it! A fresh salad to celebrate your fig harvest, healthy crunchy chickpeas for snacking, and a non-alcoholic cocktail to savor those last warm days of summer. Better yet, quite a few of the ingredients can be grown right at home.
Which Ingredients Can I Grow in a Growing Dome Greenhouse?
One of my favorite things about recipes like this is realizing just how much of the meal can come straight from the garden. In a Growing Dome, you could harvest the greens for your salad, grow onions for slicing or pickling, snip fresh cilantro and mint, and even grow some of the less expected ingredients, including chickpeas and figs.
Depending on your growing conditions and how adventurous you want to get, you can take it even further. Our demonstration domes in Pagosa Springs are home to fig trees, and greenhouse growers can experiment with other warm-climate plants such as citrus. Herbs like lemon verbena, mint, cilantro, rosemary, and stevia also give you plenty of ways to add fresh flavor to both meals and drinks.
You may not grow every ingredient in every recipe, and you don’t have to. The fun is looking at what’s ready to harvest and finding new ways to use it. A handful of greens can become lunch, fresh mint can become a mocktail, and an abundance of figs can inspire something entirely new.
Ready to grow more of what you eat?
A Growing Dome greenhouse creates a protected growing environment where you can extend your seasons, experiment with a wider variety of crops, and keep fresh ingredients closer to the kitchen.


Seasonal Growing Tips & Greenhouse Advice
Monthly stories from our greenhouses, Growing Dome spotlights, and other gardening content


Share This

After 25 years in Pagosa Springs, I’m very familiar with Growing Spaces and have been interested in their geodesic dome design since moving to the area. I now reside on the other side of the Divide in Colorado’s San Luis Valley, where I continue to experiment with high-altitude, seasonal gardening. I got my start gardening in the challenging conditions Pagosa has to offer. In a previous role with the Southwest Land Alliance, I also contributed my graphic design services to the Geothermal Greenhouse Project along the San Juan River, which features three 42' Growing Domes. When I’m not working, I’m usually camping and exploring with my husband and our dogs, Juniper and Pigeon, or tinkering with another creative pursuit, whether that’s knitting, picking the mandolin, or trying something new. As part of the Growing Spaces marketing team, I enjoy sharing the knowledge, experiences, and stories of the Growing Spaces community and helping connect more people with resources for successful greenhouse gardening.
View full bioDownloads
Featured Categories
Seasonal Growing Tips & Greenhouse Advice
Monthly stories from our greenhouses, Growing Dome spotlights, and other gardening content
Featured Stories


Vegan Chickpea and Sorrel Salad


How To Grow Fig Trees In Your Greenhouse
Featured Products


Sign up for The Happy Grower Newsletter
Once a month: stories from our gardens, Growing Dome spotlights, and what's in season in Pagosa Springs.